Dark Room Printing
Necessity
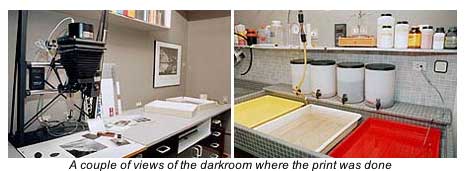
DarkroomA room that's blacked out with enough space to lay three 10x8 printing trays in a row with a bucket of water nearby and an area where you can expose the contact frame to light. Some photographers convert a spare room into a permanent darkroom others temporarily black out a bathroom or spare bedroom while they work. We'll look at making a darkroom in a future issue.
Light source
Most photographers who make contact prints will also be making prints using an enlarger. This provides an ideal concentrated light source for the exposure of the contact sheet, but is not essential because a contact sheet can be made using the room light or a reading light.
Sheet of black card
This is used to make a test strip and should be larger than the area of paper that you intend to cover to make the test.
Contact printing frame
Why you need it:One of these can be bought from your local photographic supplier. It's a frame that holds a sheet of 10x8inch printing paper and the negatives are slotted into strips on the back of a sheet of glass that is then clamped tightly against the paper.
Alternatives:
You could lay the negative strips on a piece of printing paper and then hold these flat with a sheet of heavy glass. This can be difficult because the negatives may curl and not lay flat, then, when you place the glass over the six strips, one may move, so overall it's well worth buying a frame.
Safelight
Why you need it:A light source with a red or orange dome that does not fog paper so it allows you to see what you're doing in a room that would otherwise be totally dark.
Alternatives:
Red bulb that replaces your household lamp. These can be used providing you do tests with your paper first to make sure it doesn't fog. Some lamps are only coated over the bulb and the base area lets white light through. You'll see the whites become grey, when processed if fogging is occurring.
Pack of 10x8in printing paper
Why you need it:Printing paper is coated with a light sensitive emulsion and is used to expose the negatives on to make the contact sheets.
Alternatives:
None.
Thermometer
Why you need it:The thermometer is used to ensure the chemicals are at the correct temperature. The temperature of the developer is the most important part but, unlike film, you can watch as the image appears and adjust the developing time accordingly. If you do develop your own films you should already have a thermometer.
Alternatives:
The temperature of the developer is the most important but, unlike film, you can watch as the image appears and time the development accordingly. If you do develop your own films you will have a thermometer
Timer
Why you need it :This is used to time how long the paper is in the developer, stop bath and fixer, although accurate timing is less important than it is with film processing.
Alternatives:
If your clock or watch has a seconds finger you can use that. Even the timer on your mobile phone could be used. Or you could count out elephants!
Developer
Why you need it:A developer reacts with the exposed areas of silver in the paper's emulsion turning these parts black to form an image. Areas that receive more light become blacker when developed. Areas that receive no light stay clear. You have to use a developer to produce a result.
Stop Bath
Why you need it:An acid solution that quickly counteracts the developer to prevent over development of the paper.
Alternatives:
You can use water but it doesn't stop the developer as quick. As it's acetic acid some people use vinegar, but it's not recommended.
Fixer
Why you need it:This dissolves any unused silver halides that were not developed and stops the paper from being light sensitive.
Alternatives:
You have to use a fixer otherwise the printed image will eventually turn black. You can make up your own fixer. See the article 'mixing your own chemicals'
Measuring cylinders
Why you need them:Most chemicals need diluting before use. The dilution rate can be difficult to measure without an accurate measuring cylinder, especially when the chemical to water ratio is large.
Alternatives:
Any household measuring jug can be used providing it has the necessary measuring scales. You must not then reuse the measure for food because the chemicals used for processing are harmful.
Running water
Why you need it:To ensure all traces of fixer are removed before the print is dried.
Alternatives:
It's possible to wash prints in a bucket of water, but keep changing the water to ensure best results and give each print a final wash under a tap.
Three developing trays
Why you need them:To hold the developer, stop bath and fix for processing.
Alternatives:
Some photographers use cat litter trays or garden seed trays (without holes). Make sure the trays are shallow and not much bigger than the maximum prints you intend to make to avoid using too much solutions to cover the print.
Print drying rack
Why you need one:It is an upright rack that has several slots for prints and allows air to travel over both surfaces to ensure rapid drying.
Alternatives:
You can make your own (time consuming), hang them up using a washing line using clothes pegs (may leave mark on border) or lay them on a carpet (back won't dry as quick also dust is more likely to settle on surface).
What is contact sheet?
A contact sheet is created by laying the negatives on a piece of printing paper and exposing them to light to create a set of mini prints the same size as the film frames. The sheet can then be stored with the negatives and is a great aid to help locate individual photos quickly in the future. Contact sheets are also useful to add notes about the photographs.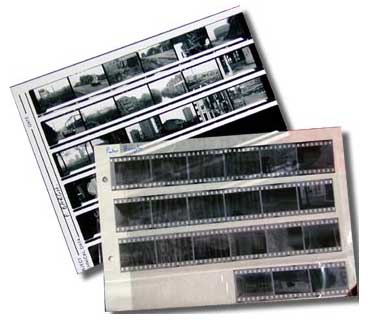

Let us begin!
1 Cut the processed film into strips. Processing labs tend to cut up in strips of four so that the negatives fit in a standard processing wallet. But for the best economy of space on your printing paper strips of six are better. Then you can get six strips on one sheet of 10x8in inch paper.2 In daylight, load the strips of negatives into the contact printing frame (if you don't have a contact printer switch off the light and lay the strips on a sheet of printing paper). Make sure all the strips are loaded up in order so all the negative numbers run in sequence and place them with the shiny side facing the glass (not towards the paper).
3 If using a multi format enlarger set it to the format of the negatives, in our case 35mm and, with the lamp on, adjust the height so that the illumination covers the entire paper area of the contact printing frame. Set the lens to the aperture you intend to print at. Ideally this should be about two stops down from wide open so around f/4-f/5.6.
4 Now, with the printing frame in place, turn out the lights off and place a piece of printing paper into the frame.
5 Cover the frame with the black card, switch on the enlarger and proceed to make a test strip.
6 Develop the exposed paper and when fixed and rinsed turn on the lights to check the best exposure.
7 Now make an exposure over the entire sheet using the exposure time that you've found from the test strip.
8 Process the correctly exposed print and dry to finish off.
© 2004 Magezine Publishing Ltd.
